On February, 17, 2015, Microsoft Outlook launched, officially, an app for the Android and iOS phones and tablets to be used as free email app. Microsoft Outlook is designed to work as the free email app to help the mobile devices users to send and received emails, from anywhere and to anywhere, along with a calendar info, contacts and other attachments across many email accounts.
Wonderful Tasks Microsoft Outlook can Perform for You
Microsoft Outlook can perform to:
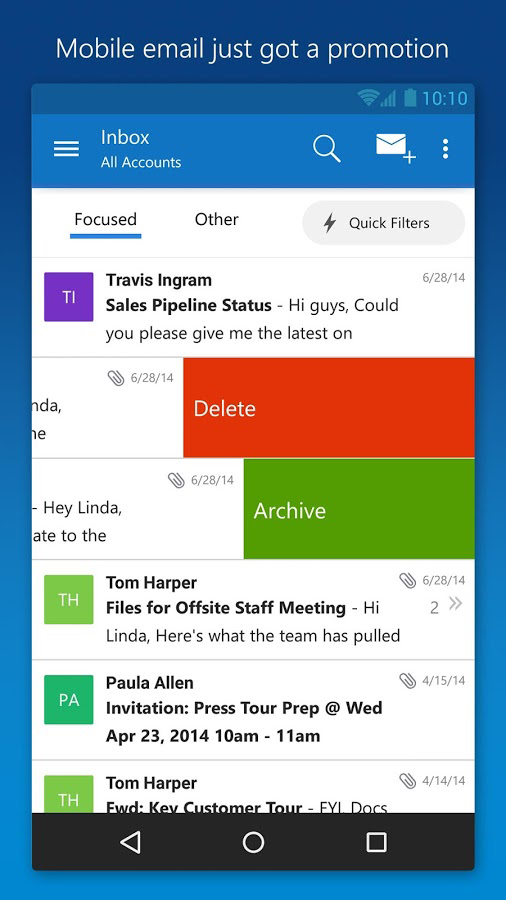
1: Swiped quickly to delete, archive or schedule your messages, accordingly.
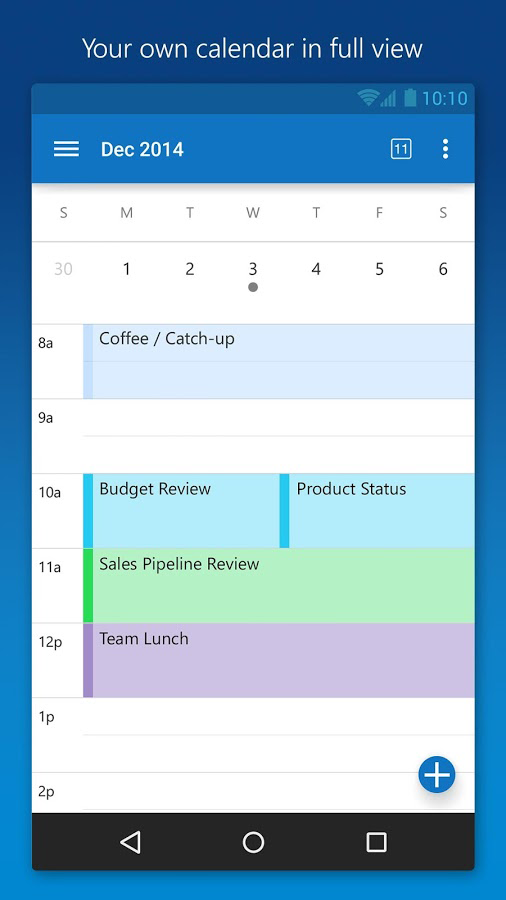
2: Can display details from in-built calendar, informing you about the details of available and free time so that you can schedule meetings.
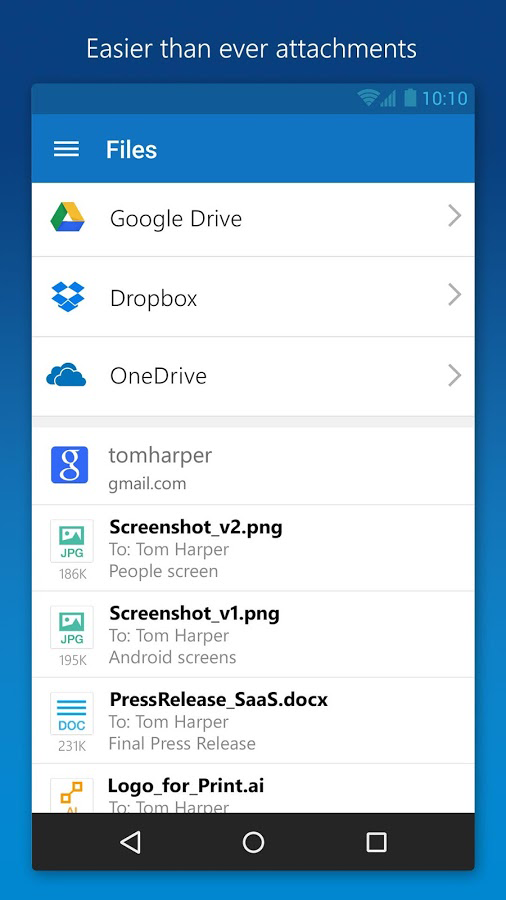
3: Can attach or download docs or files from/to email, right from your PC, OneDrive or Dropbox.
4: Microsoft Outlook can perform in association with following different platforms:
- Microsoft Exchange
- Office 365
- Outlook.com, also with Hotmail and MSN
- Gmail
- Yahoo Mail
- iCloud.
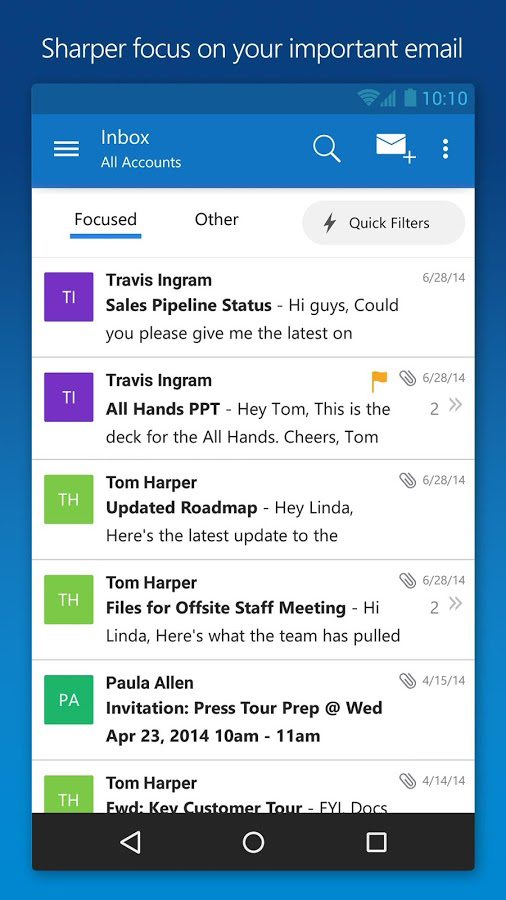
5: Microsoft Outlook is optimized to display all your emails, from different email providers, in ‘Other’ inbox.
6: You may filter your inbox, simply with one tap of finger to show messages that are unread, flagged or have attachments.
A Professional’s Office Management
Microsoft Outlook is made for the professionals who communicate, frequently, and want to see their related emails, meetings details and files on one platform, currently on different accounts.
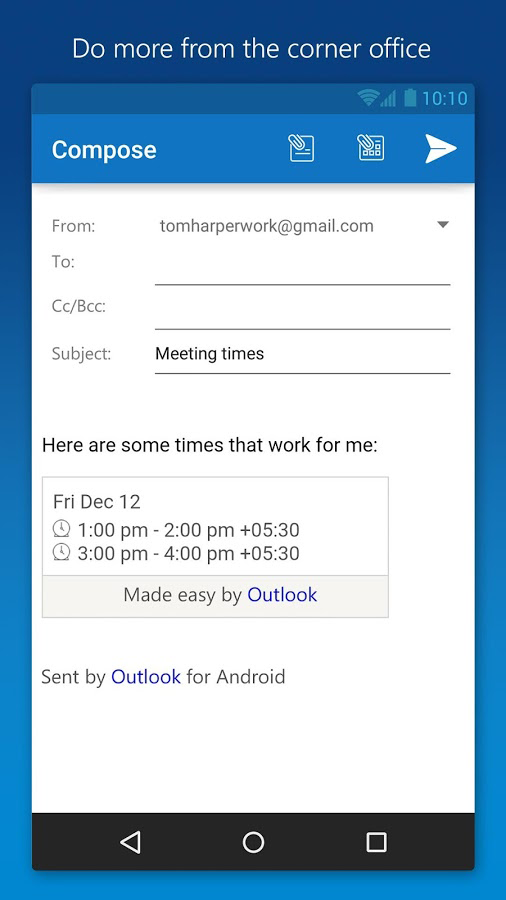
Introductory Images Gallery

5 Tips about the Microsoft Outlook
These tips have been posted, recently, by TeckFront. Repetitive images are being omitted.
- How to Add an Account in Microsoft Outlook Android 4.4.4 KitKat Device?
- How to Add Additional Email Account in Microsoft Outlook in Android KitKat?
- 3. How to Send Email from Microsoft Outlook in Android 4.4.4 KitKat Device?
- 4. How to Set Swipe Options in Microsoft Outlook in Android KitKat?
- 5. How to Set Signature in Microsoft Outlook in Android KitKat?
—————————————–
How to Add an Account in Microsoft Outlook Android 4.4.4 KitKat Device?
A welcoming feature in the new Microsoft app, Microsoft Outlook, launched for all the versions of Android OS as well as iOS devices, is its syncing ability to open more than one email operating systems in one app. It has been launched, successfully, not only for iOS operating systems but also for all the versions of Android OS. It is expected that it will be included in the Windows 10 operating system by default.
You may open your any email account – even more than one email account – in this app and operate your email right from platform of this app. A unique feature of this app is that you may open multiple email account, such as:
- Exchange
- Outlook.com
- iCloud
- Yahoo
- Other Email (IMAP)
This article is related to the opening the first account but in the next article, I will tell you; how to add other account in this app.
I am writing and getting screenshots for this article from the Android 4.4.4 KitKat OS but you may also download and apply this app in any other Android version as well.
I am sure you have already downloaded this free app from Android Play Store. If you are facing any problem to open the first account, you may consult this instructions.
Instructions
1: Tap the icon of the ‘Outlook’ from the Home screen of you Android 4.4.4 KitKat device to open up the Outlook app screen. 2: At the ‘Introductory Page’, tap the ‘Close’ button to open up the account selection screen with list of 5 mail service providers and an option to open up other email (IMAP).
  3: Here, I opted ‘Google’ to open my ‘Gmail’ account but you may open up any other email service providers’ platform. It will open up the ‘Gmail Login’ screen.
 3: At the ‘Gmail Login’ screen, write your ‘Gmail’ ID and write down the ‘Password’, as is done by you on other platforms.
  4: After writing the ‘Gmail’ ID and password, tap ‘Sign in’.
 5: At the next screen, ‘Gmail Login’ screen, see your ‘Gmail’ ID, at the right corner of the screen, immediately against the Google logo. This screen asks you to understand and allow the following:
- View and manage you mail
- View your email address
- View your basic profile info
- Manage your calendars
- View and manage the files in your Google Drive
- Manage your contacts
If you agree to the agreement, tap ‘Accept’ button to give your approval. This will complete your login to ‘Gmail’ 
 6: Tap the hamburger button, placed at the top left corner of the screen, immediately below the status bar. It will take you to the menu screen.
7: Tap the ‘Inbox’ to open up the inbox of the Outlook.  And now, start working with your email.
That’s all!
—————————————–
How to Add Additional Email Account in Microsoft Outlook in Android KitKat?
Newly developed and launched Microsoft Outlook app for the Android and iOS devices has a unique feature of ability to open more than one email ID, running in different email operating systems. You may add many email accounts in the Microsoft Outlook app and can use and read emails in the different email accounts, simultaneously, side by side.
Adding one or more than one account is easier but if you need any guidance, you may see the instructions.
Note: These instructions are for opening the additional email accounts, i.e. you have already added first account and you are adding more email accounts in Microsoft Outlook.
Instructions
1: Tap the icon of the ‘Microsoft Outlook’ app, on the Home screen of your Android 4.4.4 KitKat device to open the ‘Microsoft Outlook’ app.
2: At the ‘Microsoft Outlook’ app screen, see the one ‘Gmail’ account is already open.
3: Tap the menu button, placed at the top right corner of the screen, immediately below the status bar. It will open up a popup menu.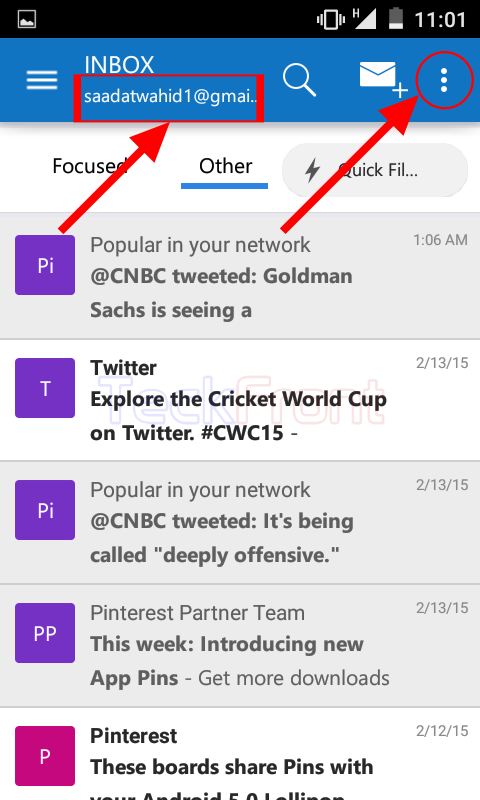 4: At the popup menu, tap the ‘Settings’ to open the ‘Settings’ screen.
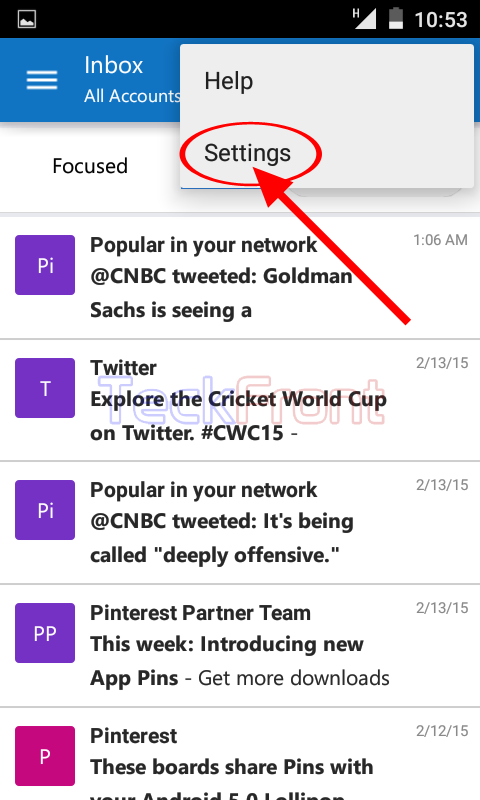 5: At the ‘Settings’ screen, see ‘Gmail’ account is already open and available (see the blue shaded account, pointed out by Blue arrow.
6: Tap the ‘Add Account’ to add more email accounts.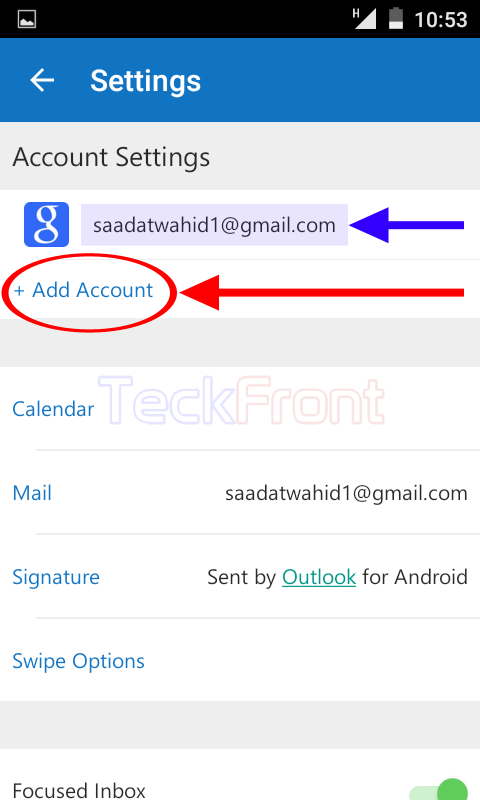 7: At the ‘Add an Account’ screen, see 5 following ‘Mail’ operating systems are listed and one more option to open ‘Other Email (IMAP) as well:
- Exchange
- Outlook.com
- iCloud
- YAHOO!
- Other Email (IMAP)
Tap any ‘Mail’ system which you want to add. I selected ‘YAHOO!’.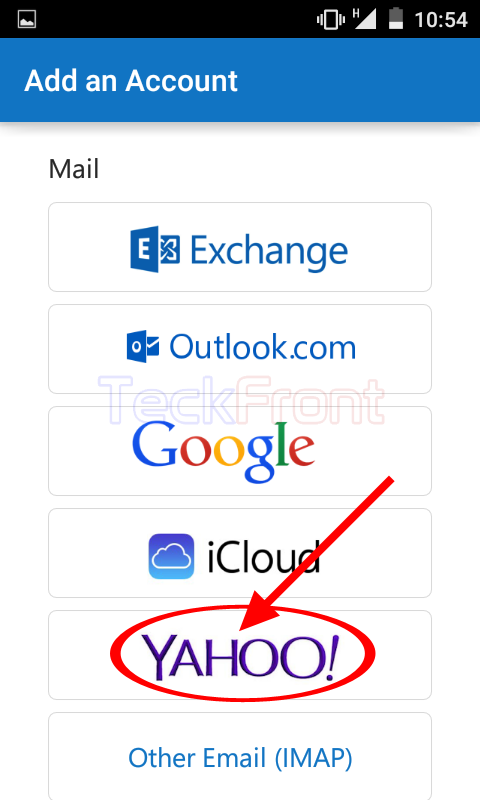 8: At the ‘Add an Account’ screen, write your email address and your password to open the account and scroll down a little.
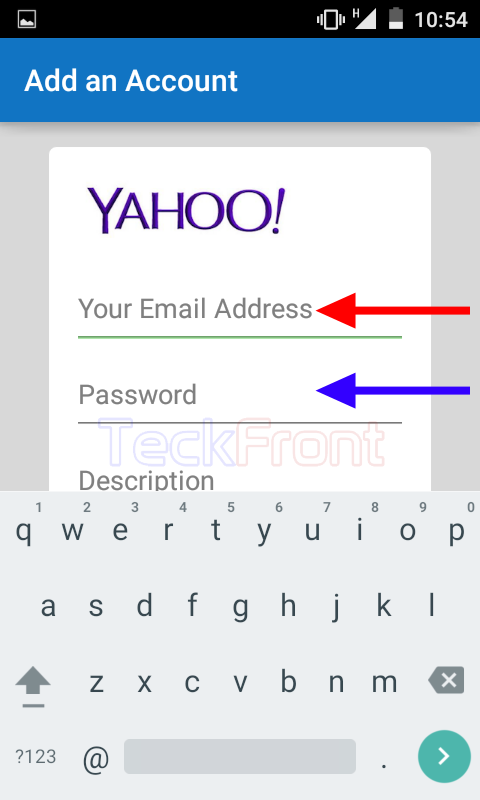
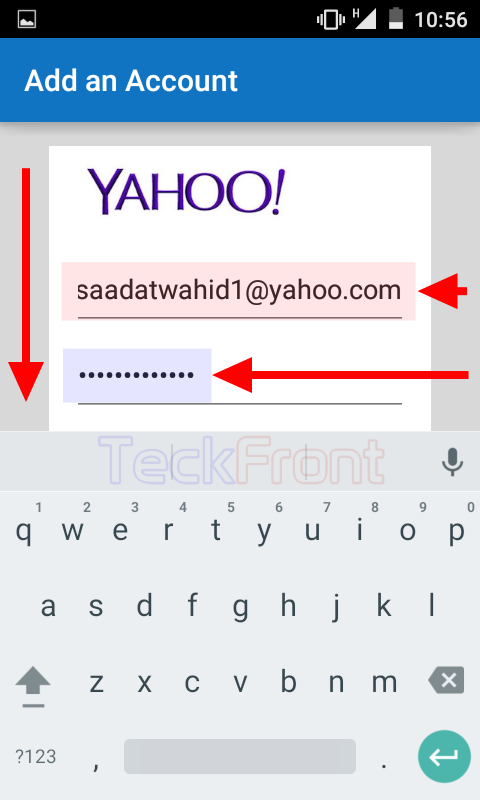 9: Tap ‘Sign in’.
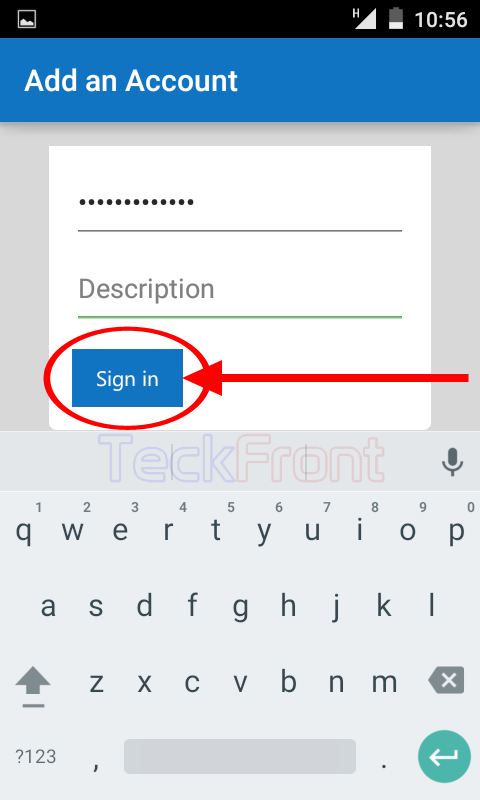 10: See at the ‘Settings’ screen, a ‘YAHOO!’ account is opened, immediately below the already open ‘Gmail’ account. Tap the ‘YAHOO!’ mail account.
 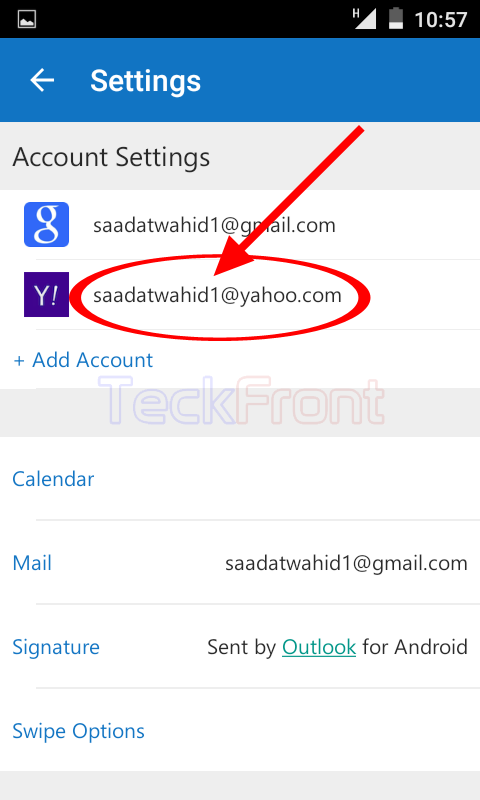 11: See an ‘Inbox’ of the ‘YAHOO!’ mail account will be opened. You may tap the emails to open and read.
12: If you want to open the ‘Gmail’ account, tap the hamburger button, placed at left of open ‘YAHOO!’ account address. It will take you back to the ‘Inbox – All Accounts’ screen.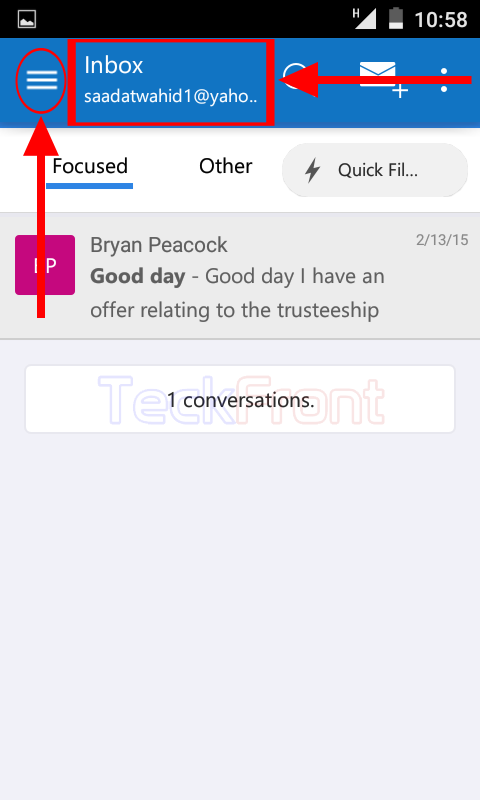 13: At the ‘Inbox – All Accounts’ screen, tap the popup menu button, placed at the right of the ‘All Accounts’. It will open up the list of all the open email addresses. See the list of all the open accounts is also available at the bottom of the screen.
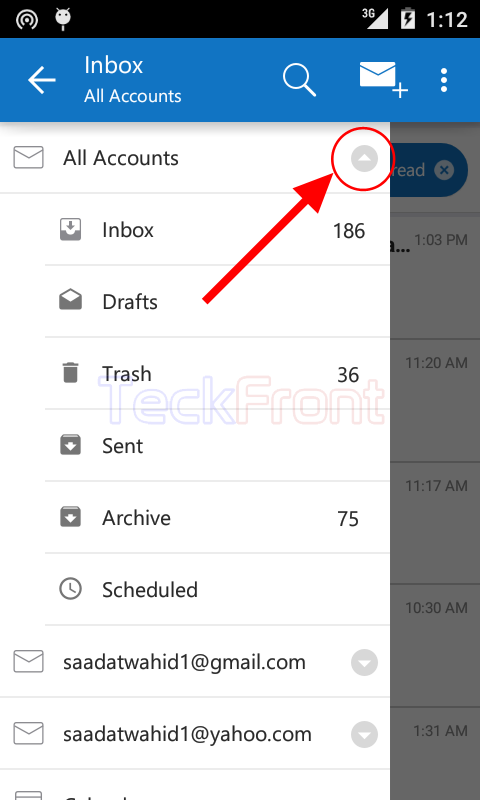 14: Tap the ‘Gmail’ account address. It will open up the inbox of ‘Gmail’ account.
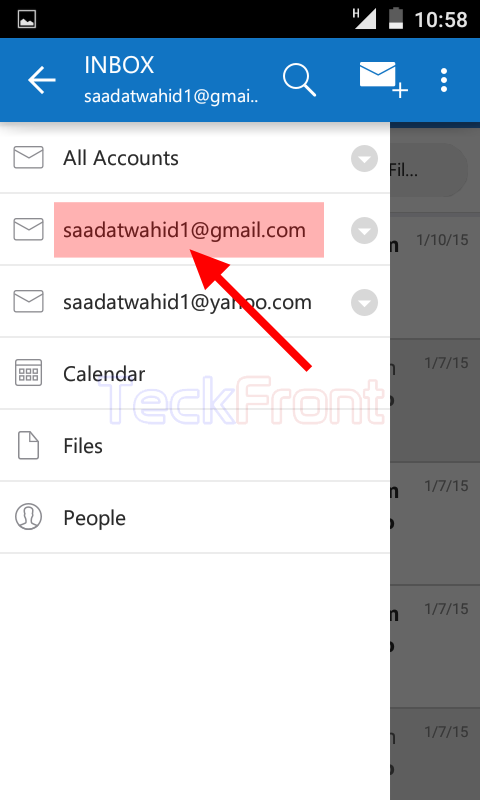
 Similarly, you may add and open other email accounts in the ‘Microsoft Outlook’ app.
Now, start enjoying the wonderful Microsoft Outlook app by reading all emails at one screen and yet simultaneously.
That’s all!
—————————————–
How to Send Email from Microsoft Outlook in Android 4.4.4 KitKat Device?
Like opening the different accounts of email in Microsoft Outlook, though separately yet simultaneously, Microsoft Outlook can be used to send emails from different accounts. For the purpose, one app is used but can be used to send from different email accounts.
It is easy but if you do not understand, see the instructions.
Instructions
1: Tap the icon of the ‘Microsoft Outlook’ app at the Home screen of your Android 4.4.4 KitKat device to open the app screen.
2: At the ‘Inbox – All Accounts’ screen, tap the ‘Message Compose’ button, placed at the second from the first at the top right corner, immediately below the status bar. 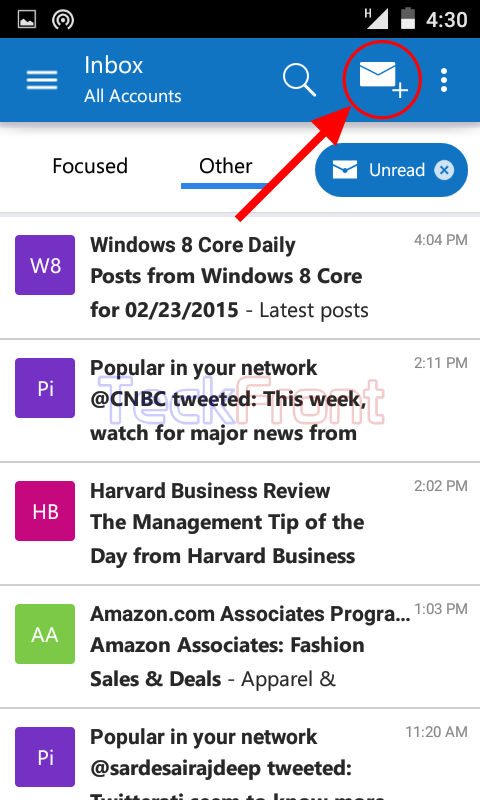 3: At the ‘Compose’ screen, see the current email address is ‘YAHOO!’. If you want to send the email from any other email ID, tap the popup menu button, placed at the right of the email address. It will open up the popup menu.
 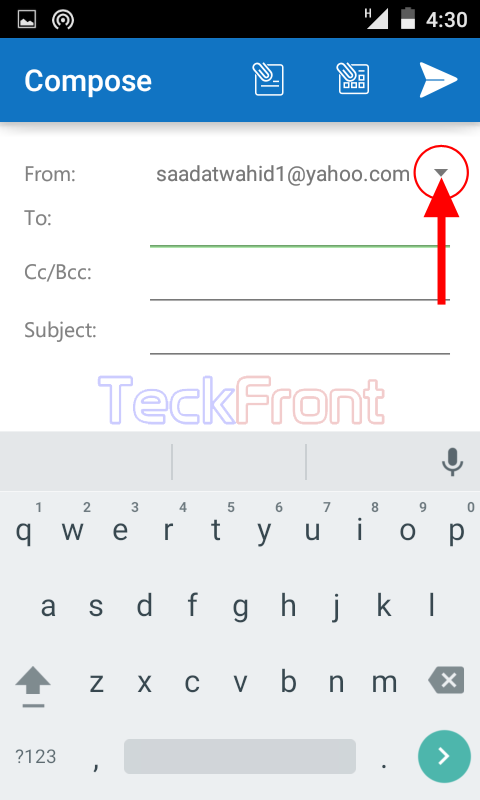 4: At the popup menu, see there, currently, 2 email addresses:
- YAHOO!
- Gmail
I did not changed the email address and again tapped the ‘YAHOO!’ ID.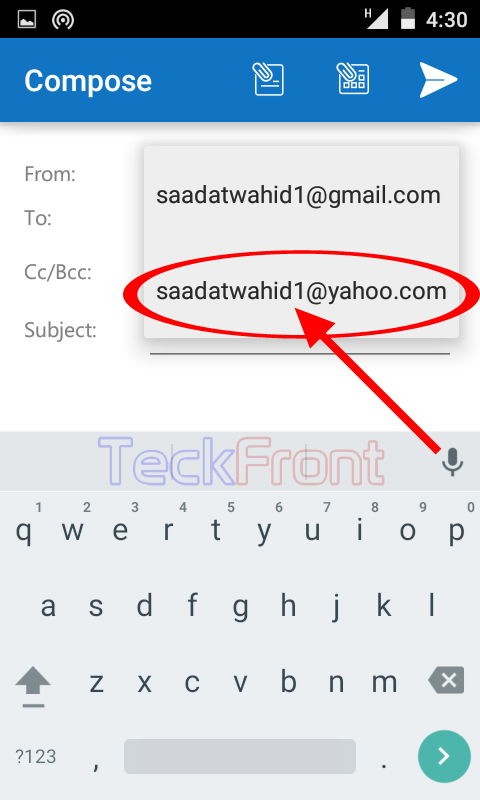 5: Now, tap the start of the space, set for the email address of the receiver of the email message, against the ‘To’.
 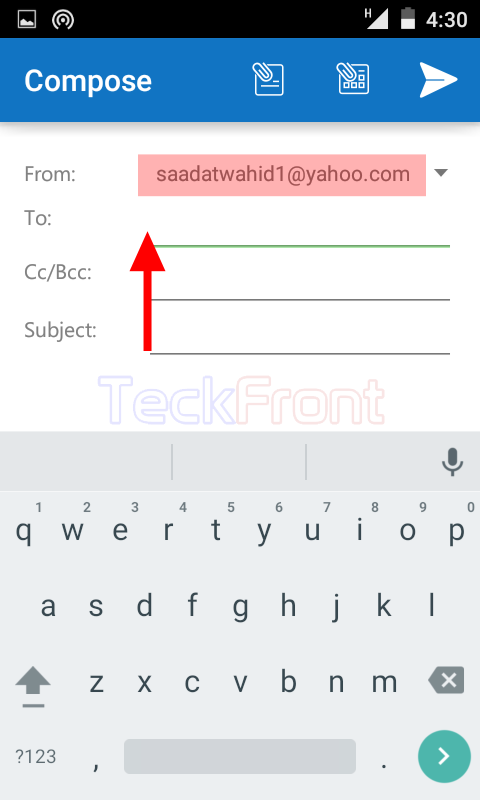 6: I wrote just ‘a’ and a popup option opened below, offering the different email addresses. I selected the one and tapped it. You may select the email address the receiver of your choice. It will appear at the space, available for the address of the receiver.
  7: At the space available for the ‘Subject’ I tapped and wrote HBD. You may write your subject.
8: Similarly, after the ‘Subject’, I tapped at the space, available immediately below the ‘Subject’ line and above the ‘Signature’ – see the signature here is; ‘Sent by Outlook for Android’. This signature is set by default. 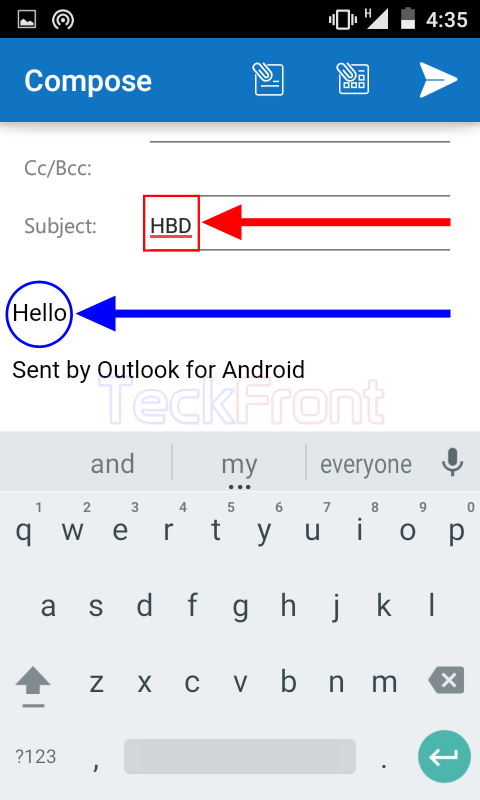 8: Now, tap the ‘Send’ button, placed at the top right corner but immediately below the status bar. See when I placed the finger on the ‘Send’ button, a screen tip informed us that this button is set to send the message. Tap the ‘Send’ button to send the message to the receiver.
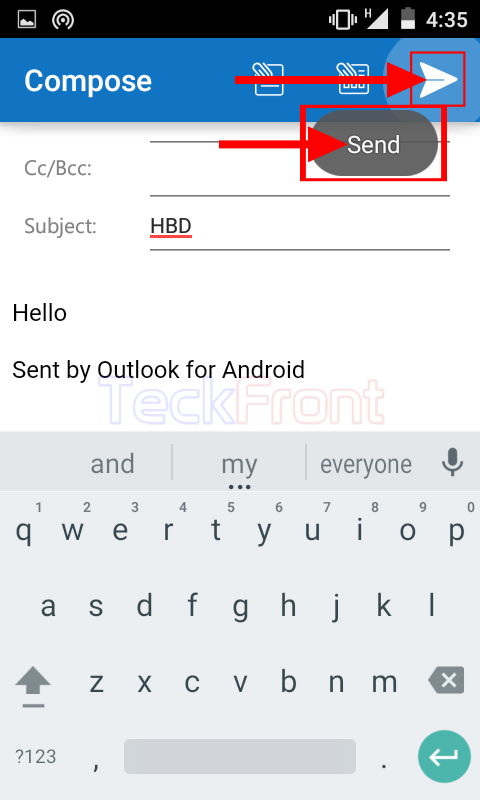 That’s all!
—————————————–
How to Set Swipe Options in Microsoft Outlook in Android KitKat?
How careful Microsoft is about the details of settings for the best performance of software is evident from the setting of the swiping options for the emails in inbox. Though disposing off and discarding the emails from the inbox depends upon the specific user and the app developers, Microsoft has adopted a unique method of disposing the emails, after reading. Microsoft Outlook offers you many possible options to discard the read emails from the inbox.
You may adopt any of the methods to dispose off the email but if you feel any problem to understand the methods, don’t hesitate to see the instructions.
Instructions
1: Tap the icon of the ‘Microsoft Outlook’ app on the Home screen of your Android device to open the screen of the app.
2: At the screen of ‘Outlook’, tap the overflow menu button, placed at the top right corner of the screen, immediately below the status bar. It will open up a popup menu. 
3: Tap ‘Settings’ in the popup menu.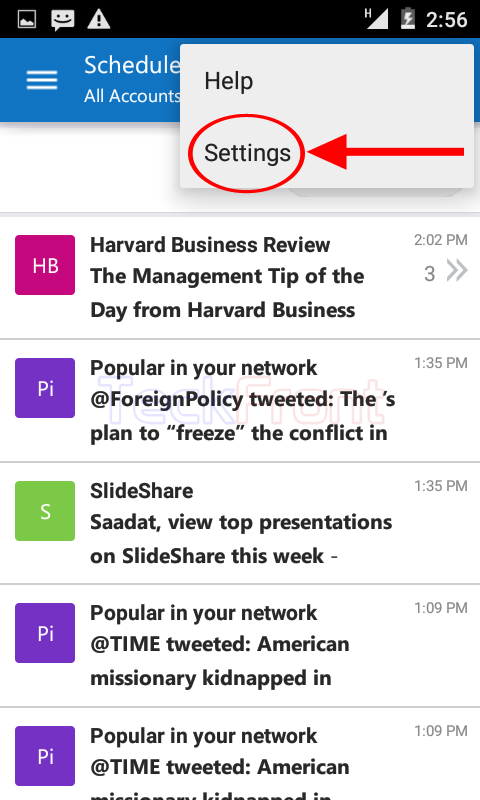 4: At the ‘Settings’ screen, scroll down to the bottom of the screen and tap ‘Swipe Options’.
 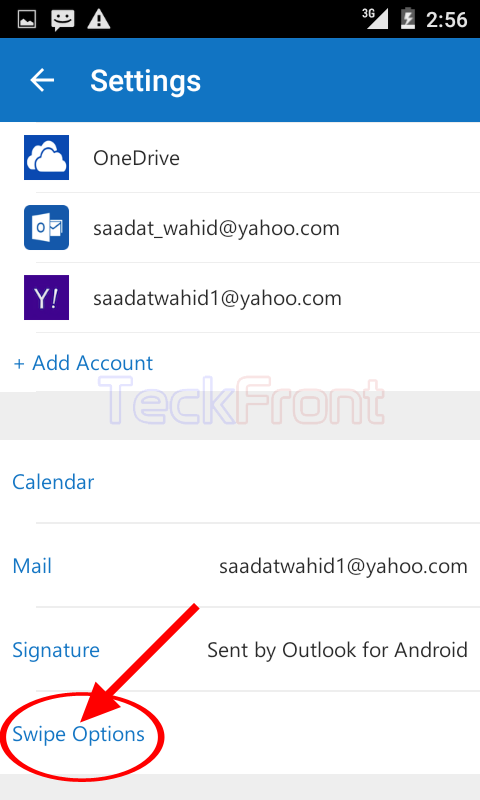 5: At the ‘Settings’ screen, see 2 options are given:
- Swipe Left
- Swipe Right
First of all, tap the ‘Swipe Left’ option to configure this swipe option.  6: At the next screen, named; ‘Choose Swipe Action’, see there are 7 following options to choose from, if you swipe any email to the left:
- Archive
- Delete
- Schedule
- Move
- Mark Flagged
- Mark Read
- No Action
Currently, ‘Archive’ is selected, i.e. whenever any email in your inbox is swiped to the left, it will be moved to the ‘Archived’ folder. I left this option, selected, but you may select any other option, as per your need or requirements. Tap ‘OK’ to save and go back to the ‘Settings’ screen. 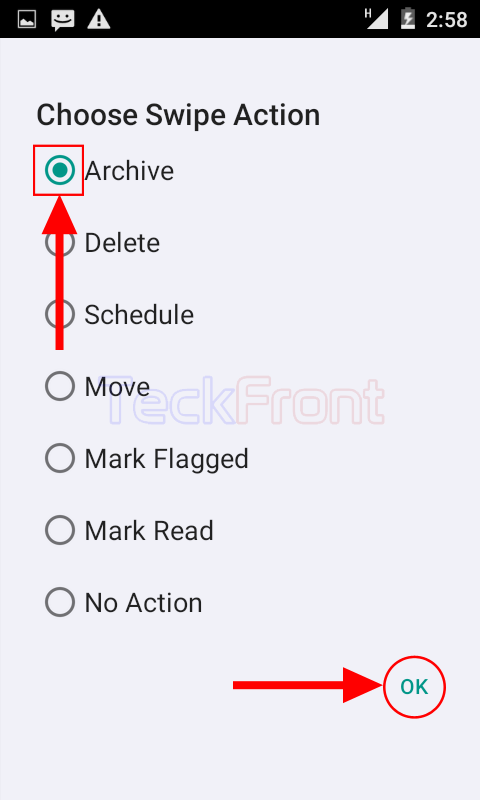 7: Now, at the ‘Settings’ screen, tap the ‘Swipe Right’ option to configure it. If you want to keep this option of movement of email to rchive whenever you swipe to right, you may left the screen after tapping the ‘OK’ button to save the option. 8: But, at the ‘Choose Swipe Action’ screen, I selected ‘Delete’ as option if the email in the inbox is swiped to the right and tapped ‘OK’ to save and go back to the ‘Settings’ screen.
 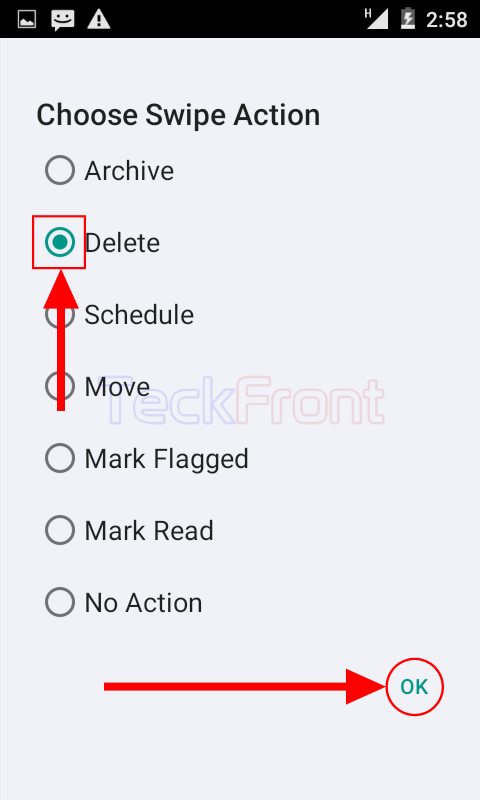 9: Now, go back to the ‘Inbox – All Accounts’ and swipe any email to the left. See, as you swipe the email to the left, the color of the email, which is being archived, is turned to dark Green. When you have swiped to the left of the screen, the email will be vanished fromt he inbox and will be moved from inbox to the archived folder.
  10: If you swipe to the right, see the color of the email will start turning to the sharp Red color. When you have swiped to the extreme right, the email will vanish from the inbox and will be deleted.
 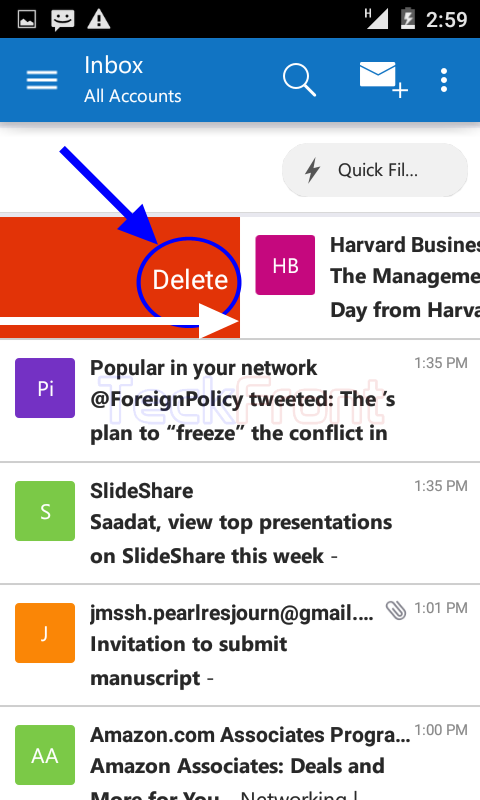 That’s all!
—————————————–
How to Set Signature in Microsoft Outlook in Android KitKat?
The ultimate identification of the sender of the message or email is the signature of the sender. When you are using a specific software to write and send a message, it is a part of ethics to disclose and acknowledge the platform. Further, if you want to favor your friends or contacts, to whom you are sending the message or email, it is good idea to invite them to use the same platform as is being used by you.
Microsoft Outlook is an app, usage of which is a proud idea for the users of Android. So, you may use the signature to inform and invite the other people to use the Microsoft Outlook as well.
You may set and change the already set signature, set by default. If you feel need, please do see the instructions.
Instructions
1: Tap the icon of the ‘Microsoft Outlook’ app on the Home screen of your Android KitKat device to open up the ‘Microsoft Outlook’.
2: Tap the ‘Overflow’ menu button, placed at the top right corner of the screen, immediately below the status bar. It will open up a popup menu. 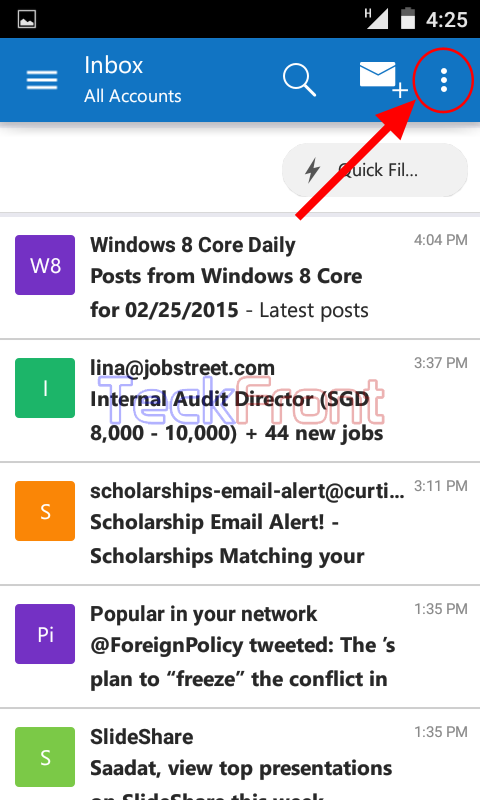 3: Tap ‘Settings’ in the popup menu.
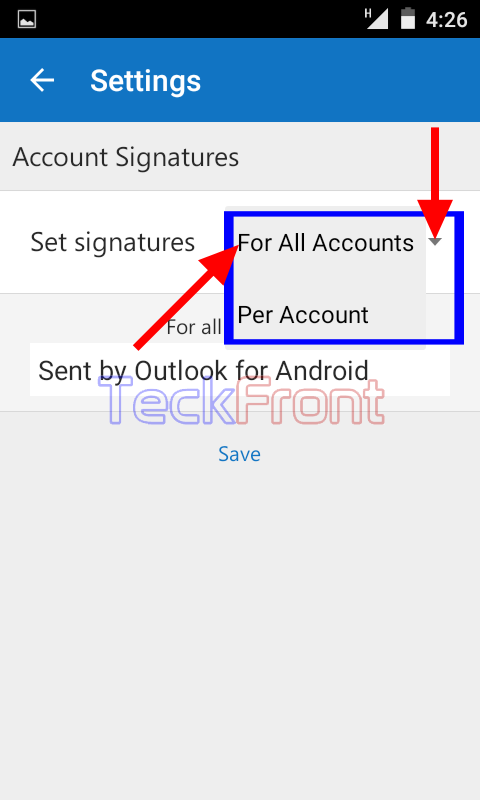
 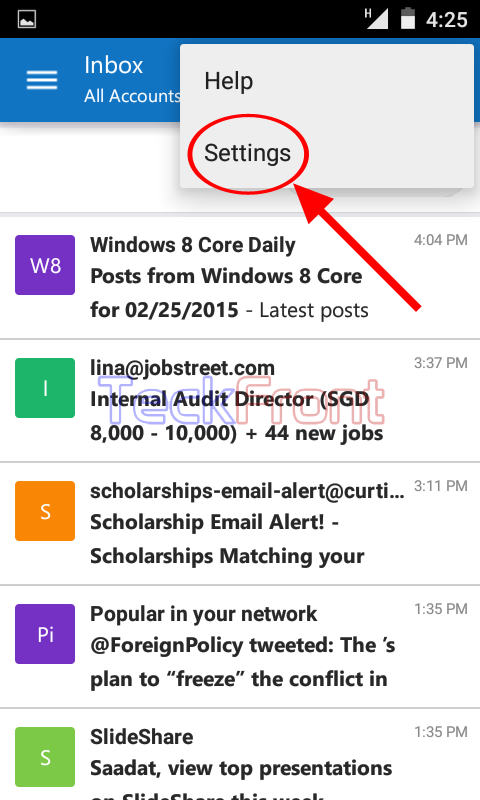 4: See the ‘Signature’ set by default is; ‘Sent by Outlook for Android’. In addition to it, see the signature is set ‘For All Accounts’ by default, i.e. this signature will be used for sending emails from all accounts. If you want to change status, tap the popup button, placed at the right of the ‘For All Accounts’. It will open up a popup menu.
  5: See 2 options are available for you to choose from: ‘For All Accounts’ and ‘Per Account’. I kept the default but you may change to ‘Per Account’, if you wish, i.e. the new signature will be available for the specific account only.
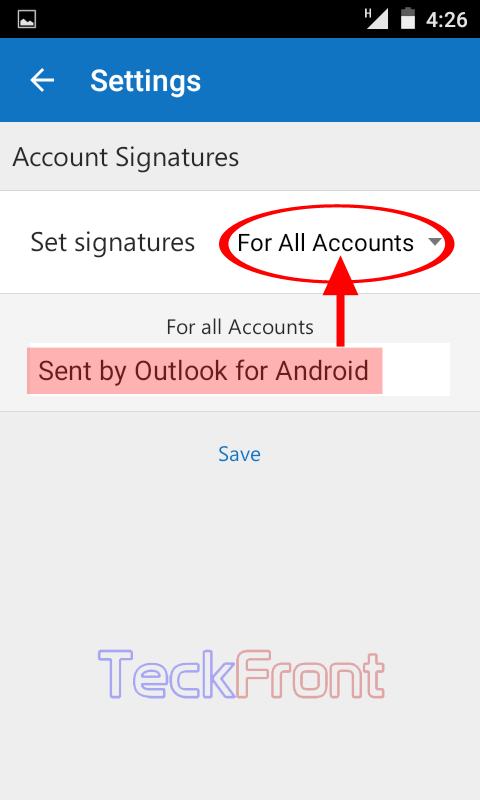
 6: If you want to change the signature, set by default, tap the signature ‘Sent by Outlook for Android’.
  7: I changed the default signature to ‘Saadat Wahid using Microsoft Outlook for Android’ with the help of keyboard, which is opened at the bottom of the screen.
 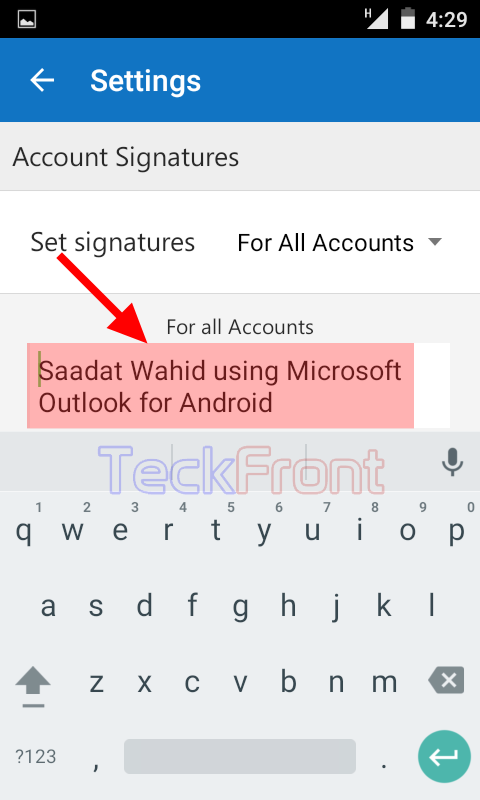 8: When you have changed the signature as desired, tap the ‘Save’ to save the change. It will take you to previous screen.
  9: See the ‘Signature’ is changed to ‘Saadat Wahid using Microsoft Outlook for Android’. Now, this signature will be used while sending emails from all accounts.
  That’s all!
—————————————–
Technical information About Microsoft Outlook
| Updated | February 17, 2015 |
| Size | 9.3M |
| Current Installs | 1,000,000 – 5,000,000 |
| Current Version | 1.0.5 |
| Android Versions Required | 4.0 and up |