Screenshot is a capturing all or just a part of the screen of computer or mobile device with any mechanism. It may include; applying and pressing some keystrokes on the keyboard of your desktop, tapping some keys with your fingers upon the Online keyboard of mobile device, using mouse or any other external method to save a whole or part of screen or any other soft mechanism. It is used to capture or take soft snapshot of any image, any written substance or any other type of ongoing process, currently on display upon computer screen.
In addition to the physical keyboards, Online keyboards are also important along with the other soft features. There are tons of other third party tools as well but these are not recommended to be applied as they may damage your operating system.
Screenshots can be used for saving the current image, writing or any other display for the future application. You may take screenshot of any still image, any part of any slide, any instant of animated image or any video. The screenshots are frequently used for further usage, for tutorials, for the students learning, for sharing with friends, for printing in the published books / journals, for the onward usage in any other software reproduction, for sharing in any website or any other blog posts.
Due to importance of screenshots, Microsoft has also included many methods of taking screenshots in Windows 10; its newer flagship operating system. As against other operating systems, there are many methods of taking screenshots. Some of these methods of taking screenshots are simple, involving just 1 or 2 keystrokes or may involve a little complex process.
As a whole, there are six best yet different methods of taking screenshots in Windows 10 which can be used by:
- Applying Snipping Tools
- Taking Print Screen
- Pressing Windows Key + Print Screen
- Windows Key + H
- Windows Logo + Volume Down
- Snip Editor
Due to importance of each of the methods, we have illustrated each of these methods in separate step by step tutorials. These tutorials are illustrated with screenshots of each step. In addition to that we have also added animated steps in instructions of each of the methods in ach tutorials.
Let’s visit each of the illustrated tutorials.
Method 1: Screenshots with Snipping Tools
Due to typical problem of cropping the screenshots after the action, as required, a Snipping Tool, a newer feature in newer versions of Windows operating systems, which has been a part of operating systems since Windows Vista. This is designed to help the users to take the screenshot, crop it as required, and then save it in the desired place or folder. It helps the users to save a lot of precious working time of the professionals which was once wasted in the cropping of the image in past. In addition to the wastage of the time, what a Windows 10 users need is a sophisticated software to crop the image, as required.
The Snipping tool is the latest surge in the screenshots mechanism and their cropping process. With this simple process, you can do many processes in this feature of Windows 10.
This is simple, but if you need some help, do consult the tutorial. The simple process can be worked upon by applying the following command line.
Command Line: Start > All Programs > Windows Accessories > Snipping Tool.
If the command line is not helpful, see the steps, given below:
1: Press or click the ‘Start’ button, placed at the bottom-left corner of the Windows 10. It will open up a vertical and upward menu of commands and operations.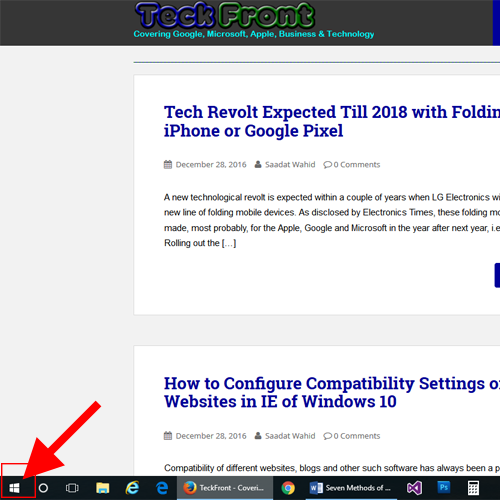 2: In the upward popup menu, scroll down to the ‘Windows Accessories’ and press it to open up a further downward popup menu.
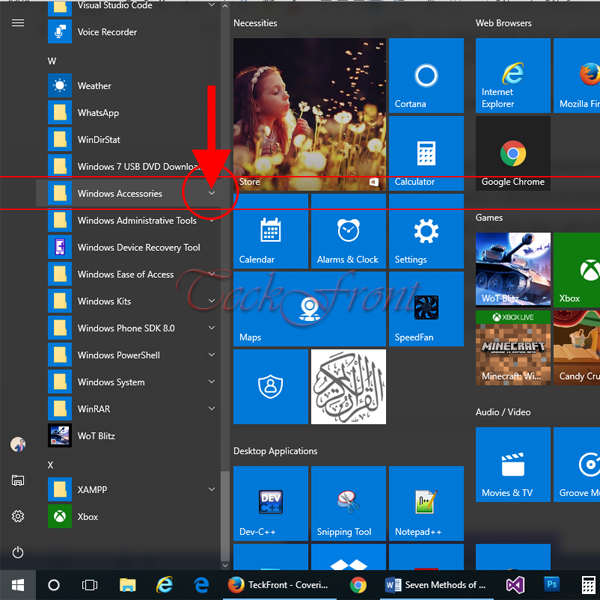 3: In the downward popup menu, displaying the ‘Windows Accessories’, press the ‘Snipping Tool’. It will open up a prompt with 4 options in it.
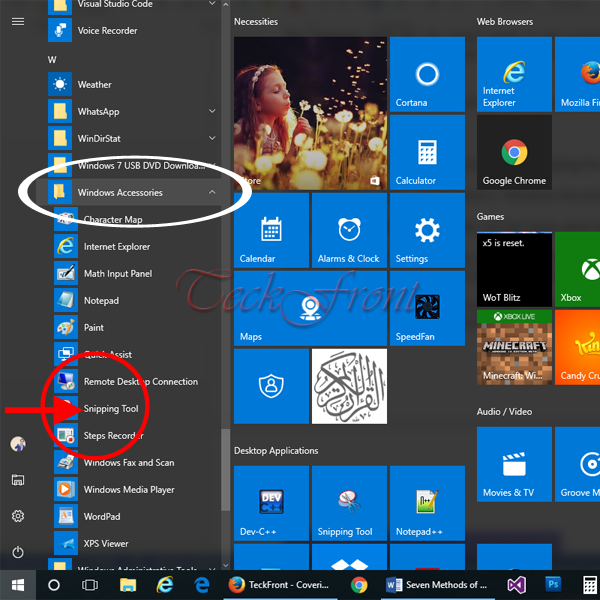 4: To explore the different options about the ‘Snip Tool’, just press the popup button, placed at the right side of the ‘New’ button. It will open up a popup menu with 4 following options in it:
- Free-Form Snip
- Rectangular Snip
- Window snip
- Full-Screen Snip
For the convenience, I opted ‘Rectangular Snip’.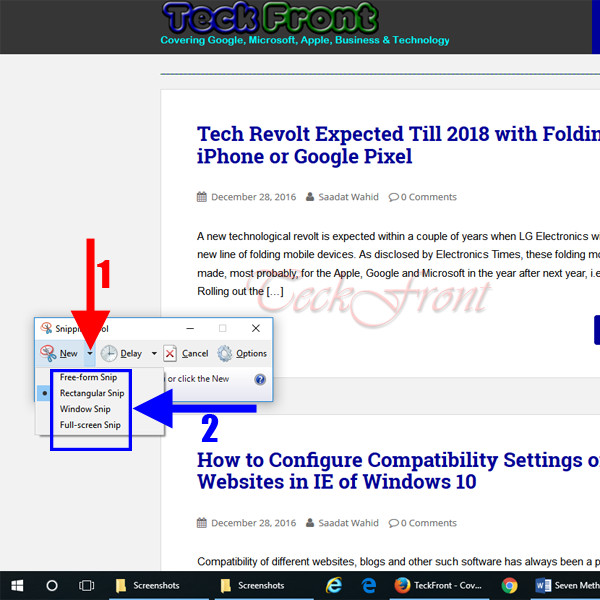 5: To start using the ‘Snipping Tool’ to take screenshots, press the ‘New’. Immediately after the pressing the ‘New’ button, whole the screen will become blurry and it will change the setup of the ‘Snipping Tool’ with instructions to drag the cursor around the area, you want to capture.
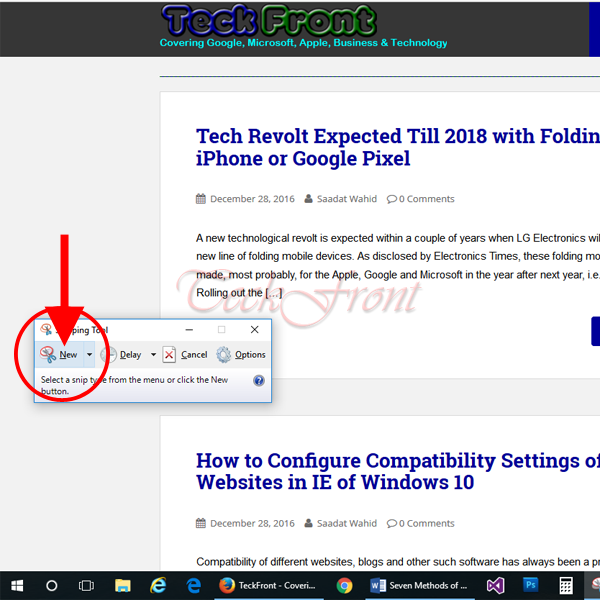 5: Just press the right button of the mouse and start applying the rectangular snip. When you will complete the snip by releasing the right button of mouse, this area will be highlighted and an interface at the top of it will offer you to save the screenshot.
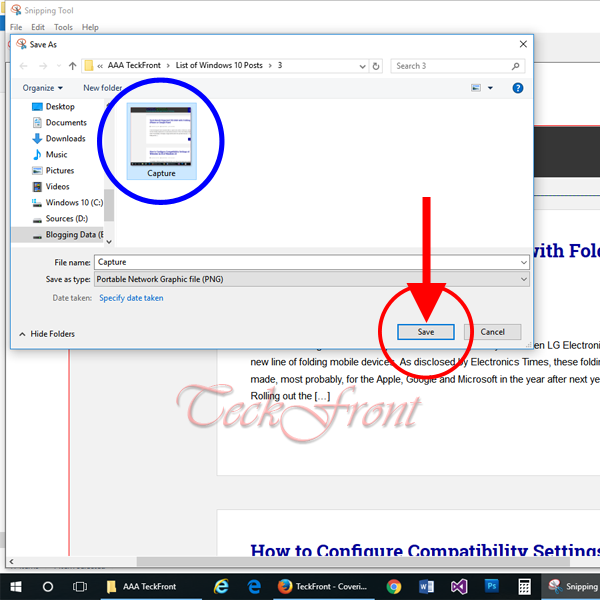
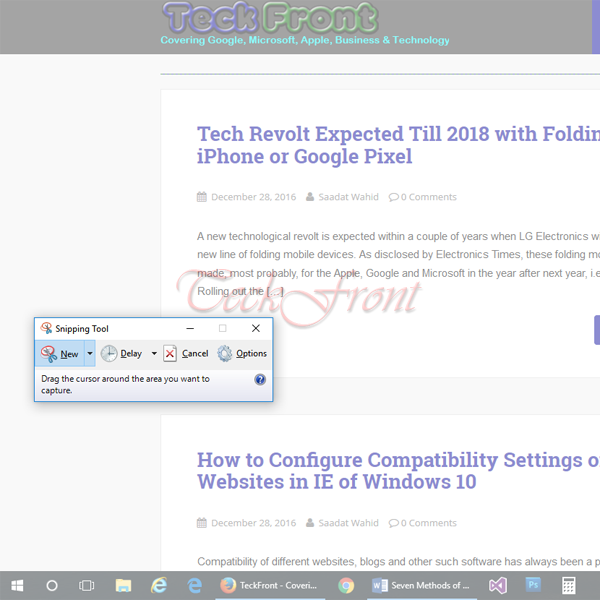 6: Just press the ‘Save Snip’ and it will take you to the file explorer of your computer where you may save the screenshot with any name. Alternatively, it will be saved with the name of ‘Capture’.
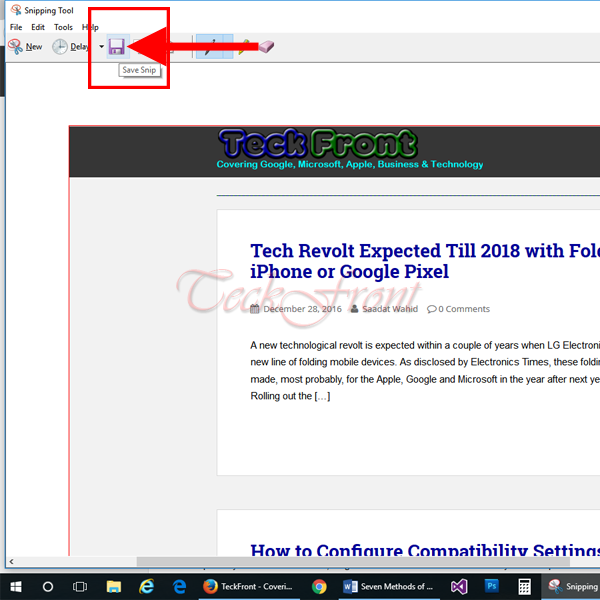
 Method 2: Screenshots with Print Screen
If you are not willing to go through so lengthy process, adopt the short method and press the ‘PrtScn’ button, made at the right of the keyboard of your computer. But, remember; by adopting the method of ‘PrtScn’ your screenshot will not be saved but will be copied to the clipboard, from where you may open up an image editing tool, paste the screenshot in the editor and save the file from there in regular method.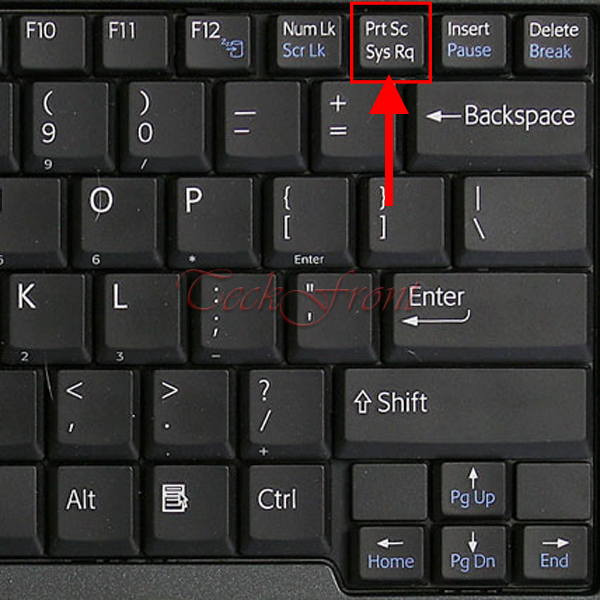 Method 3: Screenshot by Windows Key + Print Screen
This is the method which is most popular and widely applied as this is easiest and most convenient. If you are willing to capture a screenshot of entire screen, this is the best tools to apply.
1: Just press the ‘Windows Key + PrtScn’, simultaneously and screen of your computer will become dim for a Nano seconds, indicating that the screenshot has been saved.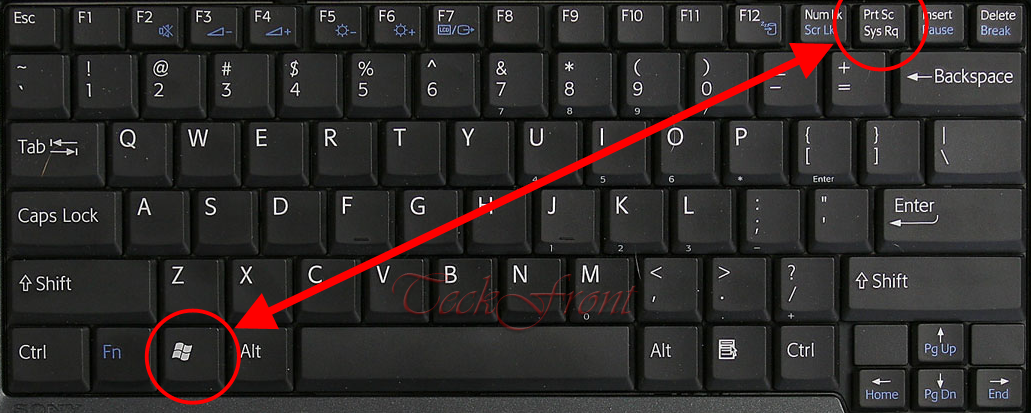 To see the captured screenshots, just follow the command line.
Command Line: This PC > Pictures > Screenshots.
2: Open up ‘This PC’ explorer site.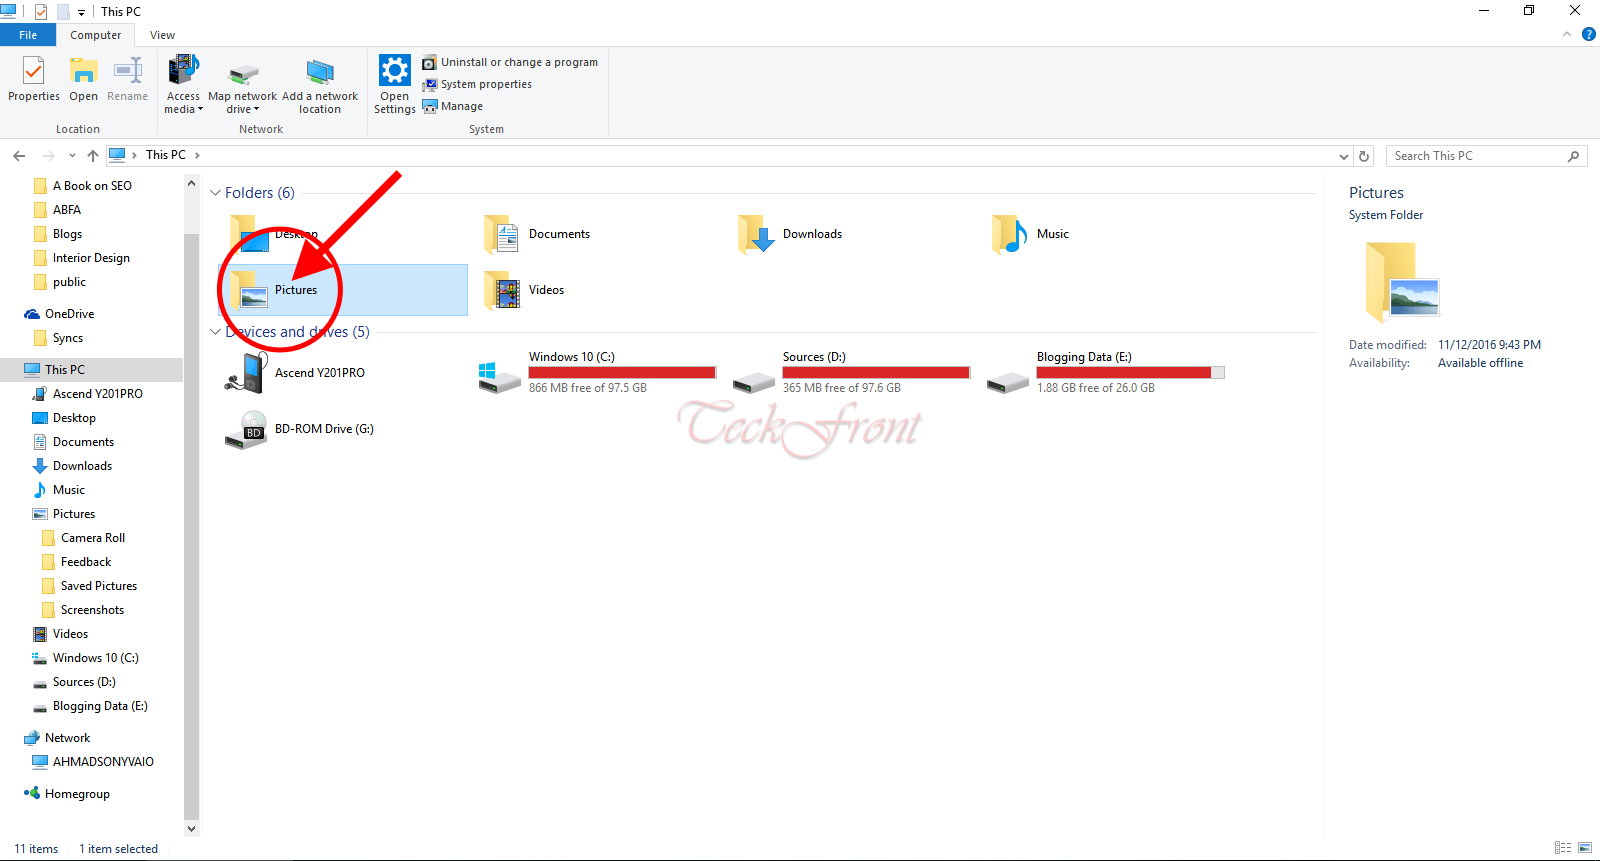 3: Open up the ‘Pictures’ folder and press the ‘Screenshots’ folder.
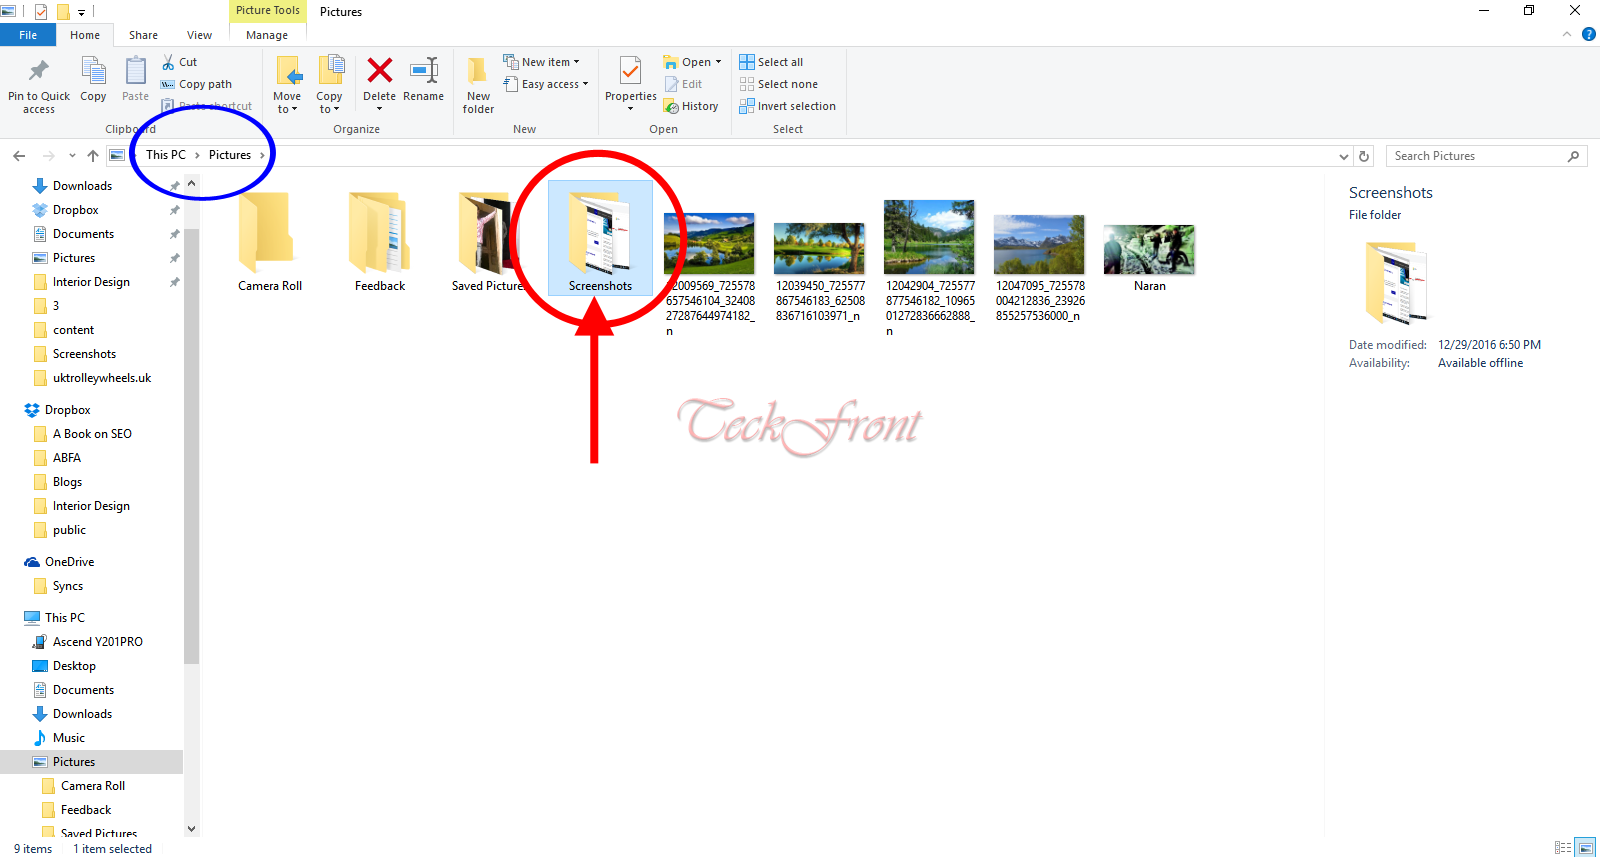 4: In the ‘Screenshots’ folder, see the saved screenshots here.
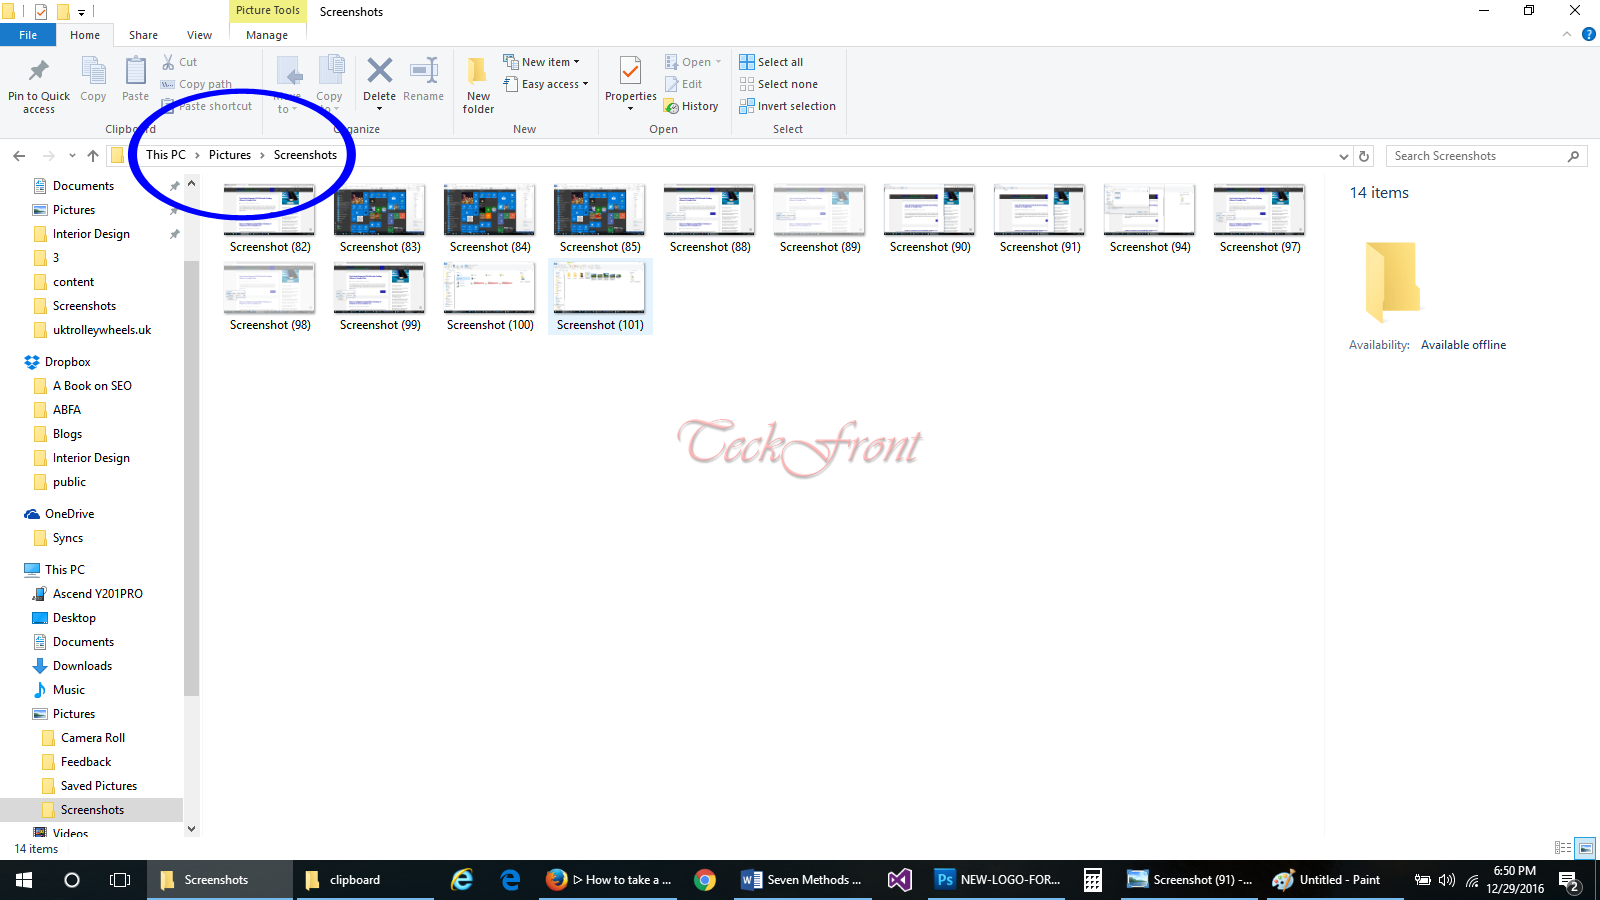 Method 4: Screenshots with Windows Key + H
If you are willing to capture some specific screen of your computer for sharing the same with the other people or send it as attached file to someone, this is the best method. This feature is designed to capture entire screen for sharing purpose.
1: If you are willing to capture entire screen, just press ‘Windows Key + H’. 2: A Charm Screen will appear at the right side of your computer window with few options:
- 3D Builder
- Cortana Reminders
- OneDrive
- OneNote
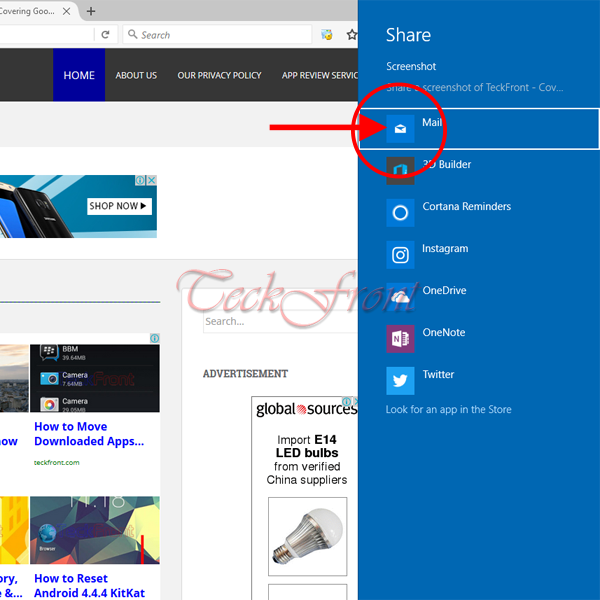 For example, if you are willing to send this screenshot to someone, you may press the ‘Mail’ in the Charm Screen and the list of all the mail options, working in your Computer will appear. Now, you may use any of the mail apps to send this screenshot to any person of your like.
Method 5: Screenshots with Power Button + Volume Down
If you are running the latest Windows Surface Pro 4 or Surface Book and you need to take the screenshot, you are required to apply the Power Button and Volume Down buttons, simultaneously.
To take screenshot in Windows Surface Pro 4 or Surface Book, just hold down the physical Power touch button and then hit the physical volume-down button on the left or right side of tablet / laptop. The screen will dim for a Nano seconds, indicating that the screenshot of the current screen has been taken and saved in the Pictures > Screenshots folder.
Screenshot with Snip Editor
Snip Editor, or Microsoft Snip, is a tool of Microsoft Garage project which is not available in Windows 10, by default, but you have to download it from site of Microsoft and install it for usage.
1: Just press the ‘Snip Editor’ link and it will take you the site of Microsoft ‘The Garage’ where an option will be given to you to download the Snip tool. 2: Just press this button and the next screen will tell you that the Snip is a Microsoft Garage project. From here, you may download the software in your Windows 10 computer.
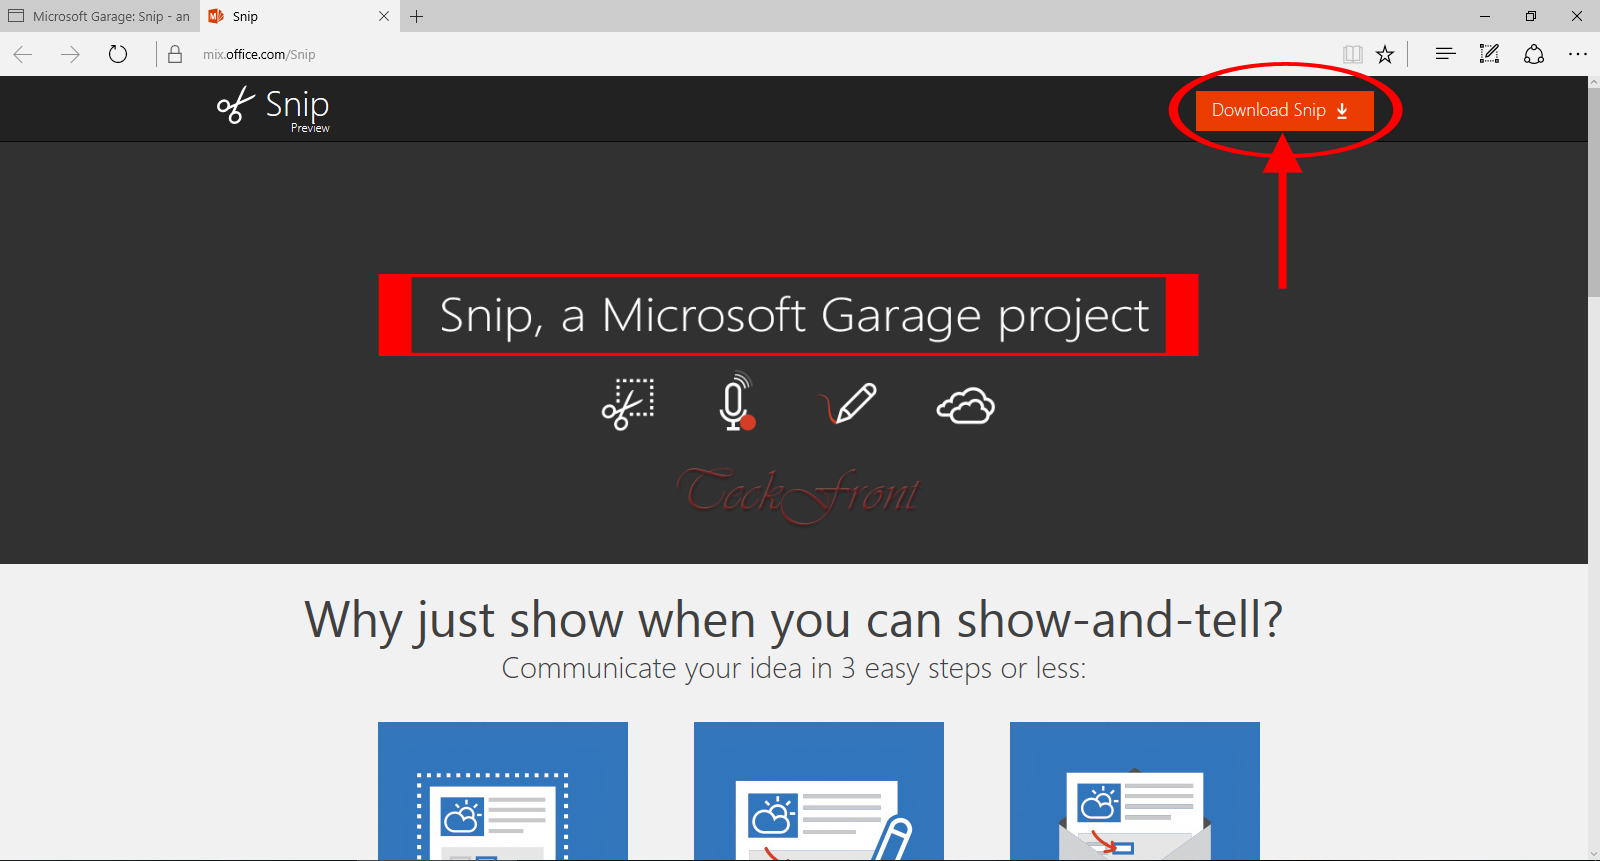 2: Just download Snip and it will appear in the file explorer of your Windows 10 computer.
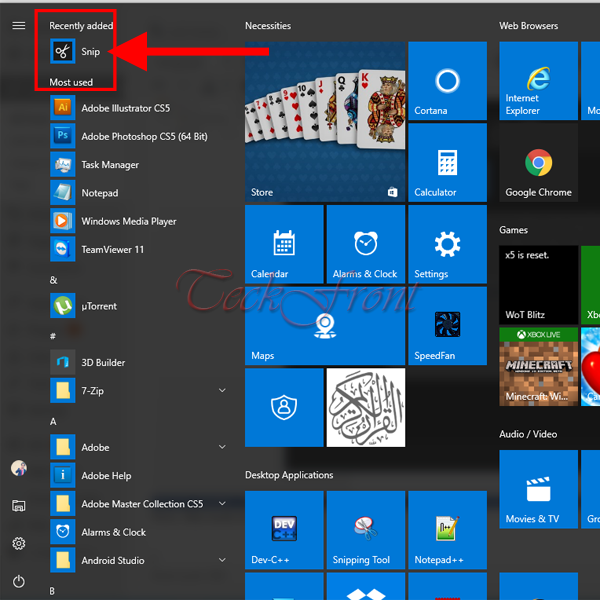 3: Now, run this Snip Editor and the next screen will inform that this feature is working as the Snip Capture tool.
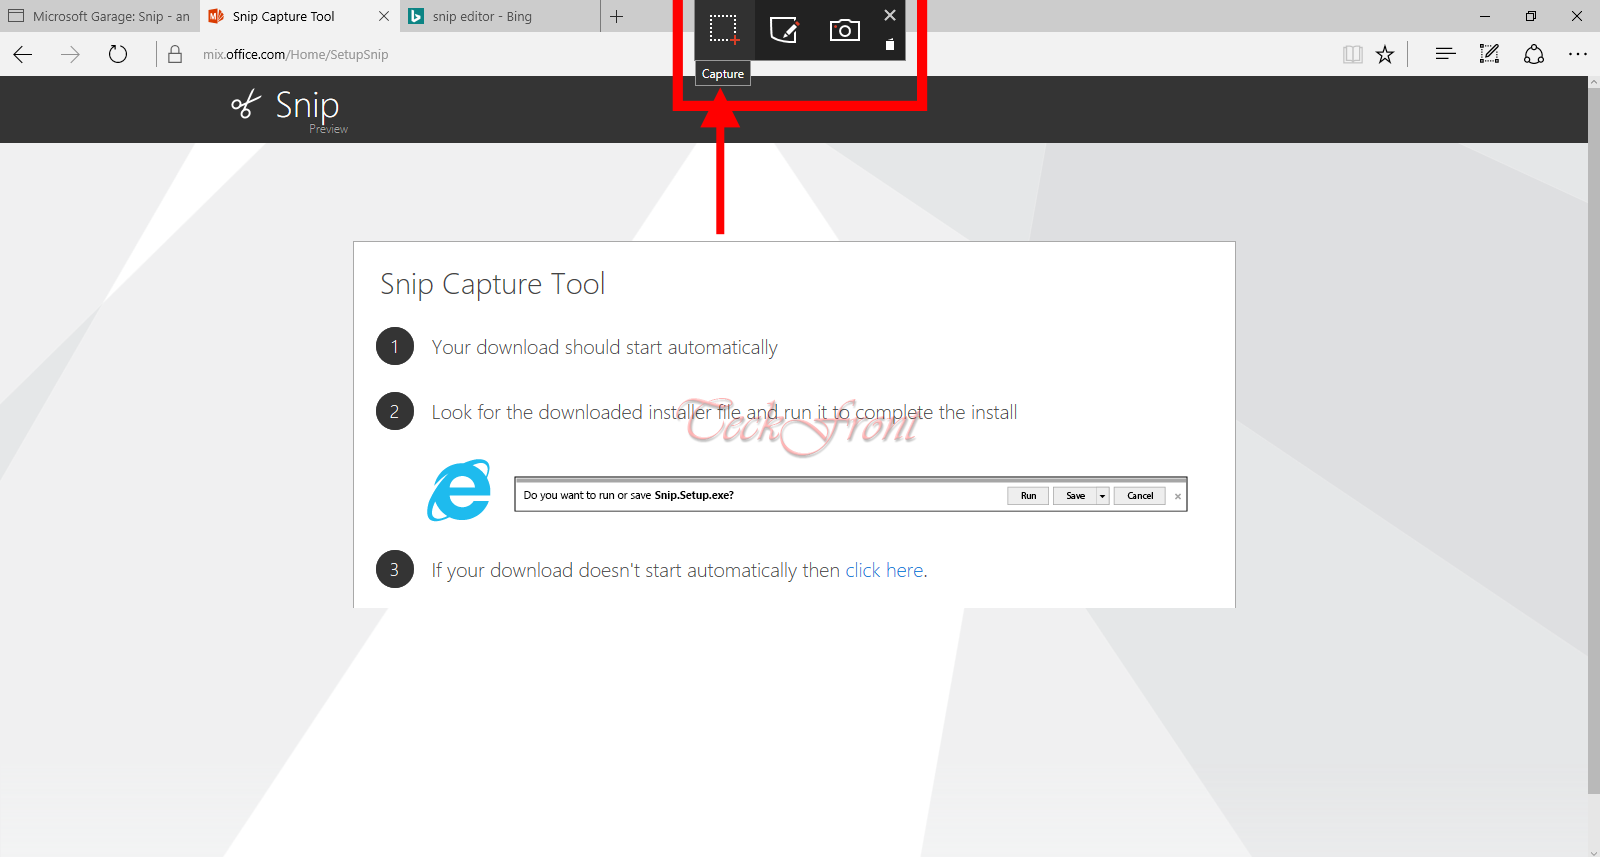 4: Many good feature included in this tool are:
- Free-hand pen option
- Voice recording
- Delay screenshots by up to 5 seconds, so you may grab images of disappearing menus
- And so on.
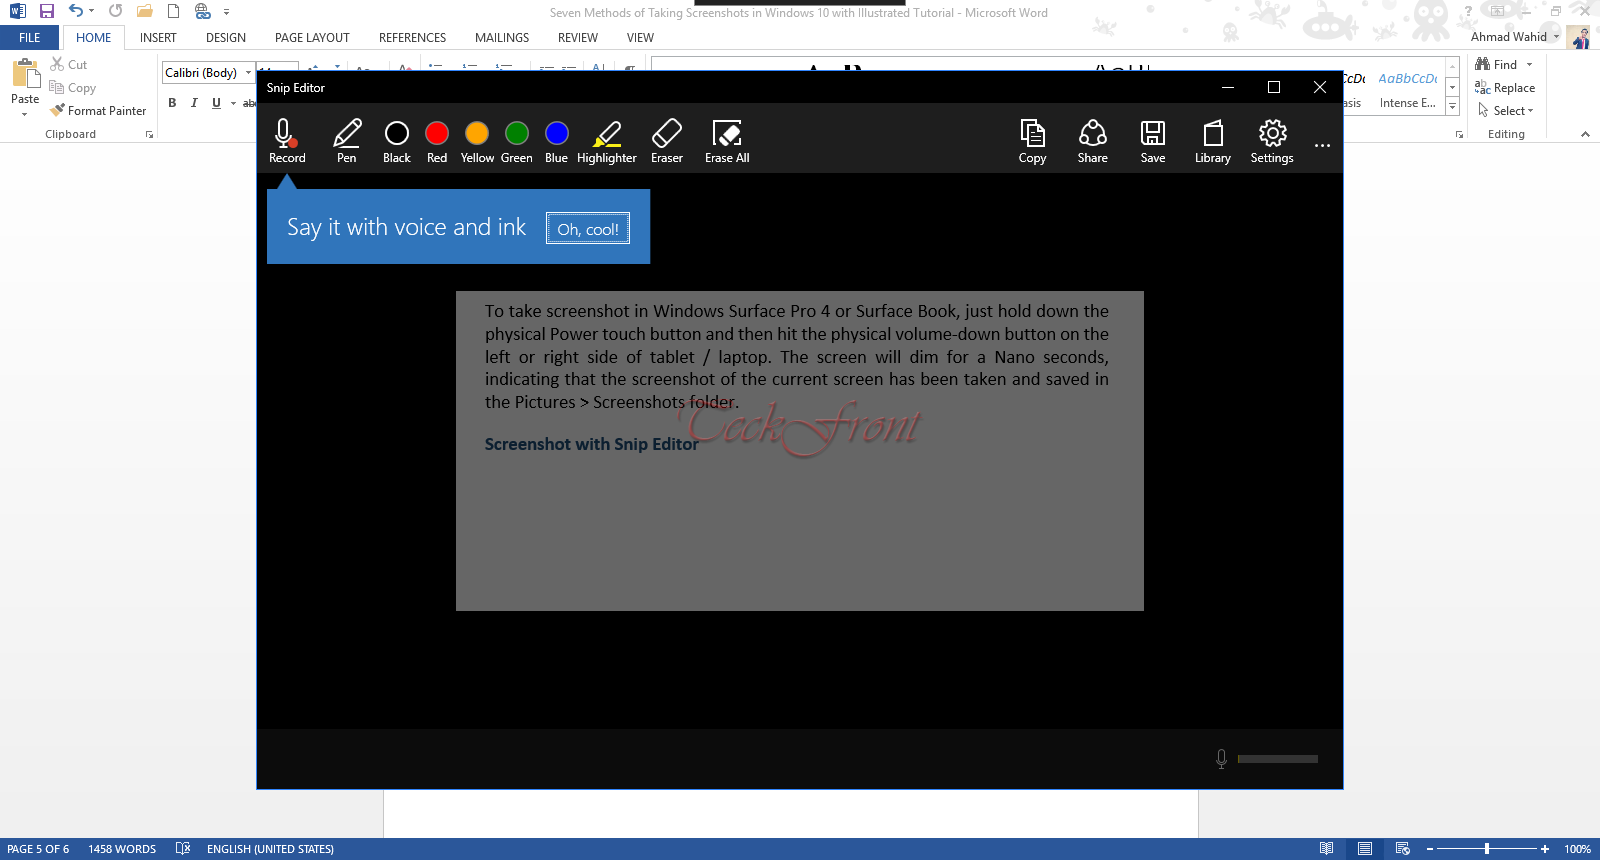 Now, this tools is available to you, whenever needed. I am sure you will find this tool very much useful than many other tools.
That’s all!